The Ultimate Furniture Product Photography Guides That Converts

Capturing furniture in a way that makes buyers click “Add to Cart” is equal parts art, science, and hustle. It’s not just about snapping a picture—it’s about crafting a visual story that screams quality, style, and “I need this in my living room.” Whether you’re a professional photographer, an e-commerce seller, or a small furniture brand looking to level up, this guide dives deep into creating scroll-stopping furniture product photography. From budget-friendly gear to lighting hacks, composition secrets, and SEO-optimized workflows, here’s how to make your furniture shine in 2025.
Building Your Foundation: Gear and Setup for Any Budget
Great furniture photography starts with the right tools, but you don’t need a Hollywood budget to get pro results. The key is choosing versatile, affordable gear and supplementing with clever DIY solutions. Let’s break down what you need and how to make it work, whether you’re shooting in a garage or a studio.
You don’t need the priciest camera to create images that sell. Focus on gear that offers control and reliability:
- Camera: A DSLR or mirrorless camera with manual settings is a must. The Canon R50 ($700) or Sony a6400 ($900) are beginner-friendly yet powerful, delivering crisp images for product listings. For pros, the Nikon Z6 II offers unmatched dynamic range for under $2,000.
- Lenses:
- A 50mm f/1.8 prime lens ($150-$250) is perfect for tight spaces, offering tack-sharp details and a dreamy shallow depth of field for close-ups of wood grain or stitching.
- A 24-70mm f/4 zoom lens ($400-$800) is your workhorse for versatility, handling everything from wide sofa shots to detailed tabletop views.
- Tripod: Shaky shots kill credibility. The Neewer 66″ aluminum tripod with a bubble level ($60) ensures rock-solid stability. For pros, the Manfrotto 055 ($200) offers durability for heavy setups.
- Accessories:
- A shutter release cable ($15) prevents camera shake during long exposures.
- A gray card ($10) ensures accurate white balance for consistent colors across shots.
No budget for fancy modifiers? These wallet-friendly tricks deliver pro-level results:
- Reflectors: Grab white foam boards ($5 at craft stores) to bounce light and soften shadows. Cut them to size for portability.
- Diffusers: Drape sheer curtains ($10 at thrift stores) over windows or lights for a soft, even glow that mimics expensive softboxes.
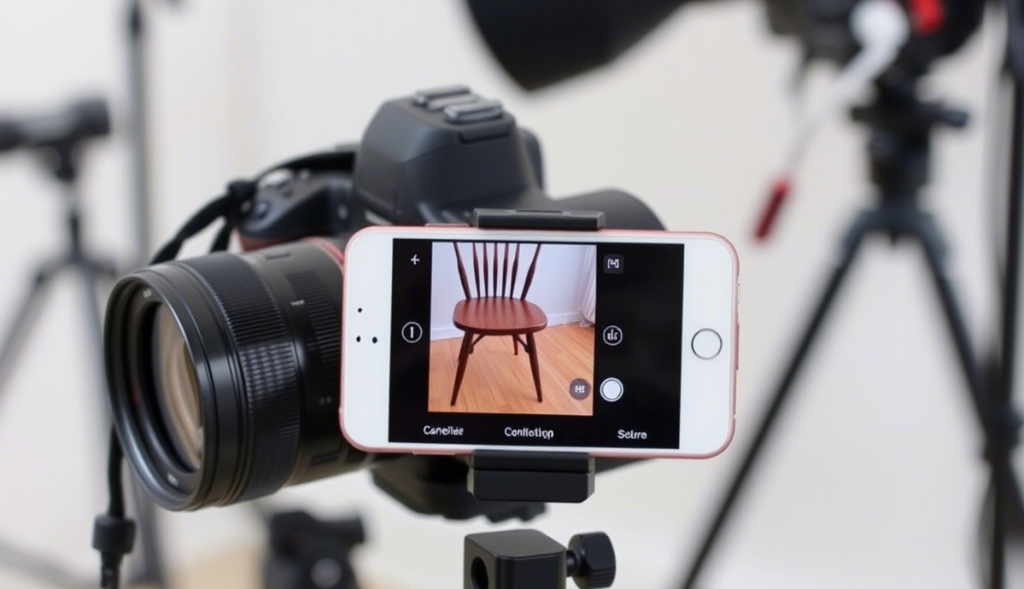
- Smartphone as Monitor: Use the DSLR Controller app (free) to turn your phone into a live-view monitor, making it easier to check focus and composition in real-time.
- Backdrop Stand: Build a PVC pipe frame ($20 at hardware stores) to hang seamless paper or fabric backdrops for clean, professional shots.
Investing in the right gear and hacks sets the stage for consistent, high-quality images. Manual camera controls let you dial in precise settings, while DIY solutions stretch your budget without sacrificing polish. For e-commerce, consistency is king—buyers trust brands with cohesive, professional visuals.
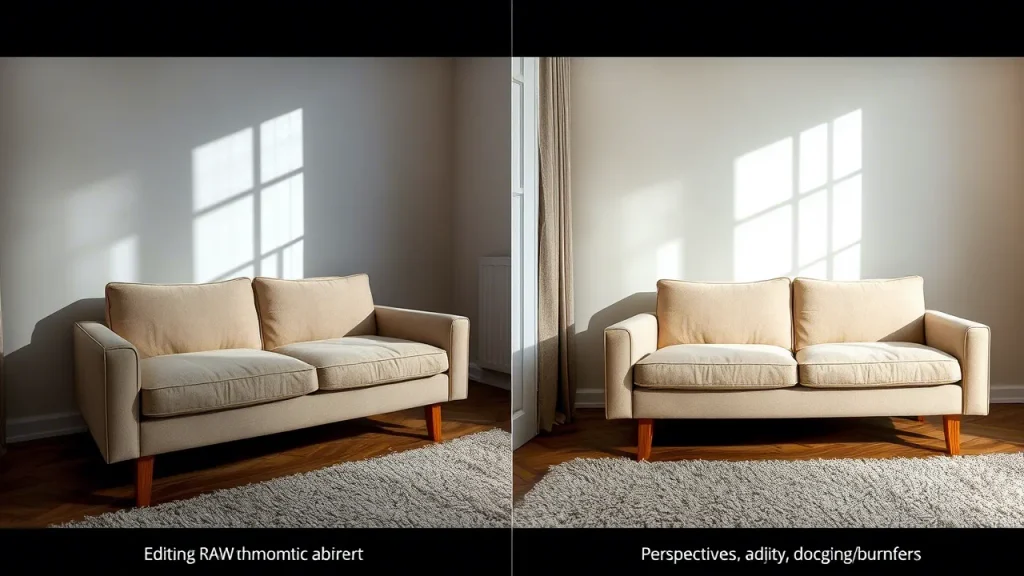
Pro Tip: Always shoot in RAW+JPEG. RAW files give you endless editing flexibility for color correction and exposure tweaks, while JPEGs are ready for quick client previews or social media posts. Back up files immediately using the 3-2-1 rule: three copies, two media types, one offsite.
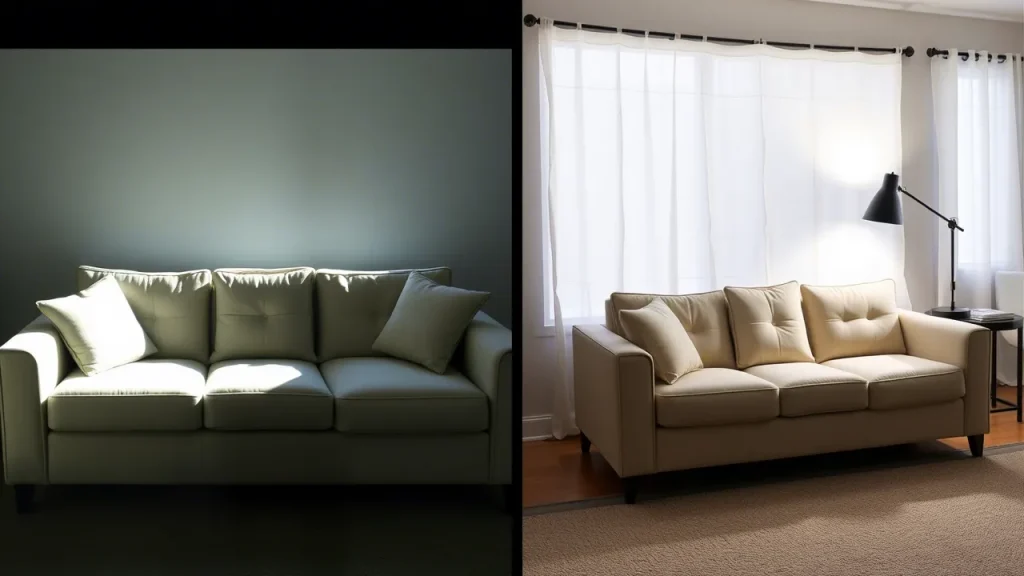
2. Lighting Mastery: Bringing Materials to Life
Lighting isn’t just about making things visible—it’s about showcasing the texture of oak, the gleam of chrome, or the softness of velvet. Each material demands a tailored approach to look its best. Here’s how to light wood, glass, metal, and upholstery like a pro.
Wood’s natural beauty lies in its grain and finish. The right lighting makes it feel alive:
- Setup: Position a softbox or diffused light at a 45° angle to the furniture. This highlights grain patterns without harsh shadows.
- Settings: Use f/8 for sharpness, 1/100s shutter speed to freeze motion, and ISO 200 for clean images.
- White Balance: Set to 5500K to enhance warm tones, making oak, walnut, or cherry pop. For cooler woods like ash, try 5000K.
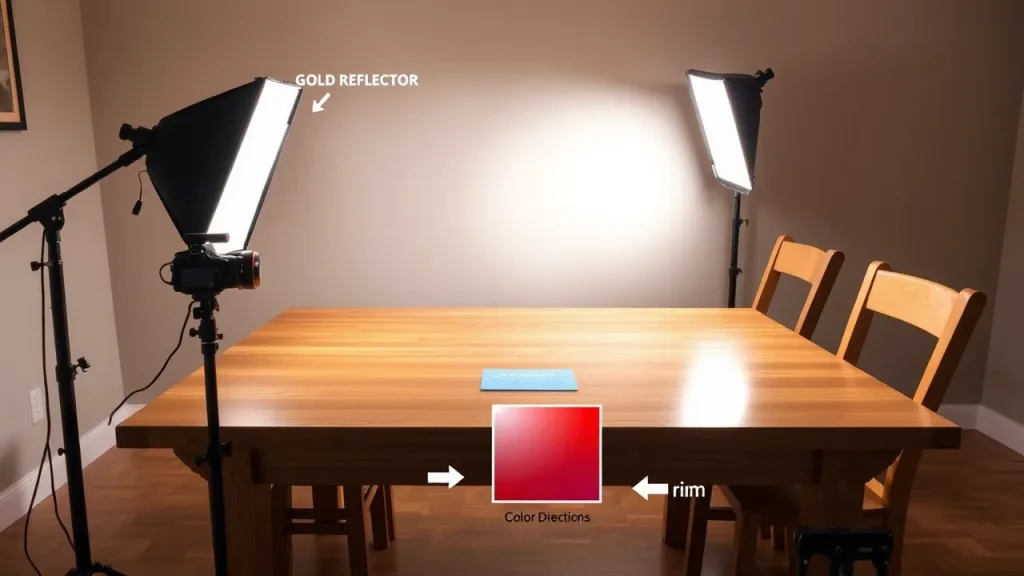
- Modifiers: Add a reflector opposite the light to fill in shadows gently. A gold reflector ($15) adds extra warmth for rustic pieces.
Trick: For extra depth, place a small LED accent light behind the piece to create a subtle rim effect, separating it from the background.
Shiny surfaces like glass and metal are reflection magnets, but you can turn that challenge into a strength:
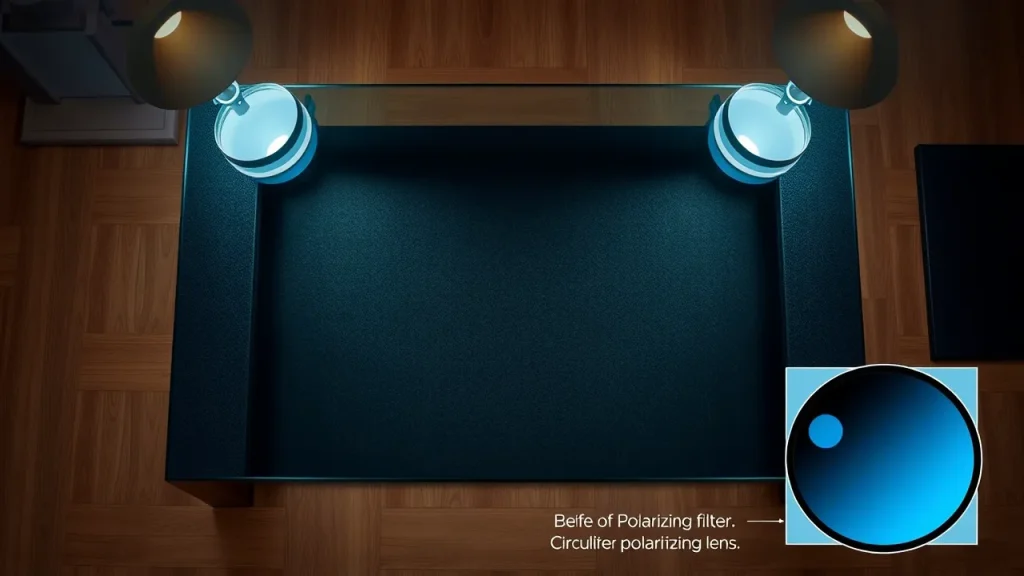
- Solution: Use a circular polarizing filter ($30) on your lens and cross-polarize with polarized gels on lights to cut unwanted glare.
- Positioning: Light from a 75° angle above the subject to create controlled highlights. Avoid direct light hitting the camera.
- Hack: Place black foam boards ($10) strategically to craft intentional reflections that add a sleek, modern vibe. For glass, try a white board for soft, diffused highlights.
- Settings: Bump up to f/11 to keep reflective surfaces in focus, with ISO 100 for maximum clarity.
Pro Move: Shoot through a black cloth with a lens-sized hole to eliminate stray reflections entirely—perfect for glossy tabletops.
Fabric and leather need lighting that feels inviting and tactile:
- Setup: Flank the piece with two large softboxes at 45° angles for even illumination that highlights stitching and texture.
- Settings: Stick with f/8, 1/125s, ISO 200 for balanced exposure. Adjust shutter speed if using continuous lights.
- Secret Weapon: Lightly mist the fabric with water (test on a hidden spot first!) to make textures like linen or velvet stand out under light.
- Modifiers: Use a beauty dish ($50) for leather to create a soft yet punchy highlight that mimics natural light.
Tip: For colorful upholstery, shoot a color checker card ($20) in the first frame to ensure accurate hues in post-processing.
Lighting shapes how customers perceive your furniture. Warm, textured wood feels cozy; sleek metal feels modern; soft fabrics feel inviting. Mastering material-specific lighting builds trust and desire, driving clicks and conversions.
Pro Tip: Always check your setup through the camera’s viewfinder—LCD screens can hide subtle lighting flaws. Keep a microfiber cloth and air blower handy to zap dust before it ruins your shot.
Composition That Converts: Framing the Perfect Shot
Composition is your secret weapon for making furniture feel irresistible. It’s not just about what’s in the frame—it’s about how it’s arranged to guide the buyer’s eye and spark their imagination. Here’s how to nail it every time.
The rule of thirds is your friend for balanced, eye-catching shots:
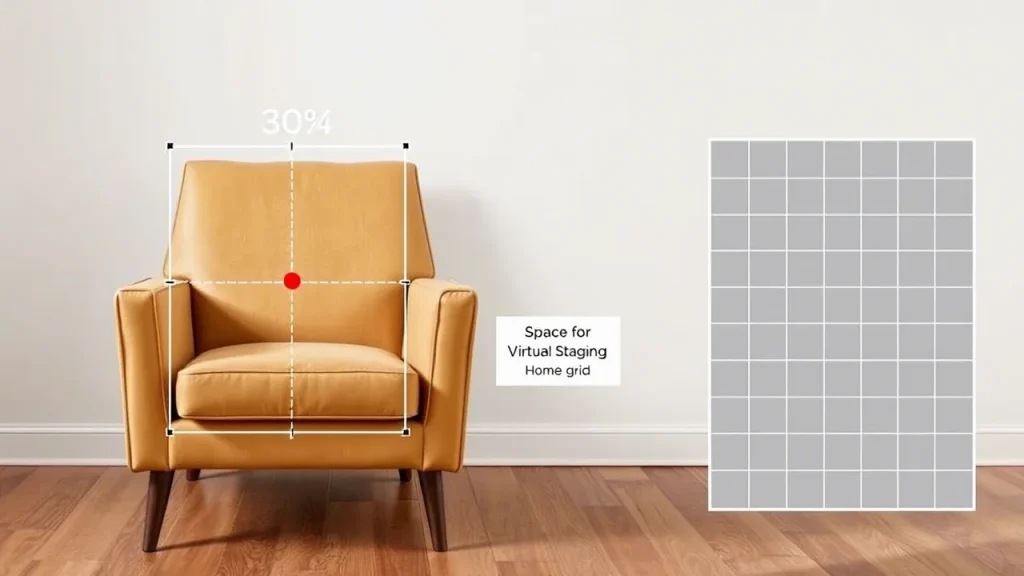
- Place the furniture’s focal point—like a chair’s armrest or a table’s centerpiece—where grid lines intersect for natural visual flow.
- Align edges (like a sofa’s backrest) with grid lines to create harmony.
- Leave 20-30% negative space around the piece for virtual staging, text overlays, or cropping flexibility.
Trick: Use your camera’s grid overlay feature to align shots in real-time, saving time in post.
Buyers need to visualize how furniture fits in their space. Use relatable props to convey size:
- A coffee mug ($5) on a side table or chair shows everyday scale.
- A 20″x20″ throw pillow ($15) on a sofa grounds its proportions.
- A cardboard human silhouette ($20) next to a bed clarifies dimensions.
- Avoid: Oversized decor like giant vases that distort perception and confuse buyers.
Hack: Include a small ruler or measuring tape in one shot for precise scale reference, then crop it out for final images.
Different angles tell different stories. Mix these up for a complete product listing:
- Front (3/4 View): Shoot at a 45° angle to showcase the piece’s overall form and design. This is your hero shot for catalogs and thumbnails.
- Detail (Overhead): Go 90° above tabletops to highlight craftsmanship, like inlays or finishes. Use a ladder or tripod arm for stability.
- Context (Low Angle): Shoot armchairs or sofas from a 25° angle, low to the ground, for a dramatic, inviting vibe that screams “sit here.”
Pro Move: For large pieces like dining tables, shoot a straight-on front view to emphasize symmetry, paired with a slight tilt to add depth.
Strong composition builds an emotional connection with buyers. A well-framed shot makes furniture feel like it belongs in their home, while clear scale and angles answer practical questions about fit and style. Nail this, and your images will convert browsers into buyers.
Pro Tip: Shoot tethered to a laptop using DigiCamControl (free) to review compositions instantly. It’s faster than chimping on the camera screen and catches subtle framing errors.
Post-Processing: Polishing Your Images to Perfection
Editing is where your shots go from good to jaw-dropping. A streamlined post-processing workflow saves time and ensures consistency across your catalog. Best part? You don’t need expensive software to get pro results.
These edits are non-negotiable for clean, professional images:
- Lens Correction: Remove chromatic aberration (color fringing) and distortion for crisp edges, especially with wide-angle lenses.
- Perspective Warp: Fix leaning verticals to keep furniture looking architecturally accurate, not like it’s in a funhouse.
- Frequency Separation: Smooth blemishes (like scratches) while preserving textures like wood grain or fabric weave.
- Dodge & Burn: Use a 3% opacity brush to subtly enhance highlights and deepen shadows, sculpting the furniture’s form.
Trick: Create reusable masks for common edits, like boosting wood grain, sharpening fabric texture, or controlling metal reflections.
Skip the Adobe subscription with these powerful, no-cost options:
- GIMP: A Photoshop rival with the BIMP plugin for batch-processing hundreds of images in minutes.
- Darktable: Apply film simulation presets for stylized looks, like vintage or modern vibes, perfect for Instagram.
- Photopea: A web-based Photoshop clone for quick edits on any device—no installation needed.
Pro Move: Use Darktable’s tethering module to preview edits live during tethered shoots, cutting down on post-production time.
Take your edits further with these pro-level tweaks:
- Focus Stacking: For deep furniture like bookshelves, shoot three frames at f/5.6 (front, middle, back focus) and blend in GIMP for edge-to-edge sharpness.
- Color Grading: Use split toning to add warm highlights and cool shadows, giving wood furniture a cozy, lived-in feel.
- Noise Reduction: Apply selectively to smooth backgrounds while keeping furniture details crisp. Mask edges to avoid softening textures.
Post-processing is your chance to fix imperfections, enhance materials, and create a cohesive brand aesthetic. Consistent edits across your catalog build trust and make your listings look polished, whether on Amazon or your own website.
Pro Tip: Save custom presets in your editing software for recurring tasks, like white background cleanup or wood tone enhancement. It’s a massive time-saver for high-volume shoots.
Platform-Specific Optimization: Tailoring for Maximum Impact
Every platform has its own rules and audience expectations. Optimize your images to meet technical requirements and grab attention, whether you’re selling on Amazon, posting on Instagram, or pinning on Pinterest.
Amazon’s strict guidelines ensure a consistent shopping experience. Nail these specs:
- Size: Minimum 1600px on the longest side, but aim for 3000px for zoomable clarity.
- Background: Pure white (#FFFFFF) only. Use a lightbox or post-process with Remove.bg to get it perfect.
- File Naming: Follow the format brand_productname_material_style_color.jpg (e.g., ashley_armchair_genuineleather_midcentury_cognac.jpg).
- Extras: Include lifestyle shots in secondary slots to show the piece in context, but keep the main image product-only.
Trick: Shoot tethered and use a histogram to ensure your white background hits 255-255-255 RGB without clipping the furniture.
Short, punchy videos are king on Instagram. Here’s a formula that works:
- Structure: Start with a 3-second establishing shot of the whole piece, zoom in for a 2-second detail close-up, and end with a 1-second lifestyle clip (e.g., someone sitting on the chair).
- Hashtags: Use #FurnitureDesign, #[Material] (e.g., #LeatherFurniture), and #[Style] (e.g., #MidCenturyModern) to boost discoverability.
- Editing: Apply VSCO film presets for a cohesive aesthetic, and add subtle text overlays like “Shop Now” in Canva.
Hack: Shoot vertical BTS (behind-the-scenes) clips during your session for Reels content. Buyers love seeing the craft behind the product.
Pinterest is all about aspirational vibes. Create pins that inspire and convert:
- Dimensions: Use a 2:3 aspect ratio (1000x1500px) for optimal display on mobile feeds.
- Text Overlay: Add “Shop This Look” or “Perfect for Small Spaces” in the bottom 20% using bold, readable fonts.
- SEO: Pack descriptions with keywords like “modern gray leather sofa,” “small living room furniture,” or “boho wood coffee table.”
- Lifestyle Shots: Show the piece in a styled room to spark ideas, paired with a clean product shot for clarity.
Pro Move: Create multiple pins for the same product with different angles or room styles to test what drives the most clicks.
Platform-specific optimization ensures your images meet technical standards and resonate with each audience. Amazon wants clarity, Instagram craves engagement, and Pinterest thrives on inspiration. Tailor your approach to maximize reach and conversions.
Pro Tip: Use a color checker in your first shot to ensure consistent hues across platforms, especially for fabric or wood tones that vary in different lighting.
Advanced Techniques: Elevating Your Craft
Ready to take your furniture photography to the next level? These advanced techniques add flair, efficiency, and wow-factor to your shots, perfect for standing out in a crowded market.
Small lights can create big impact, especially for specific furniture types:
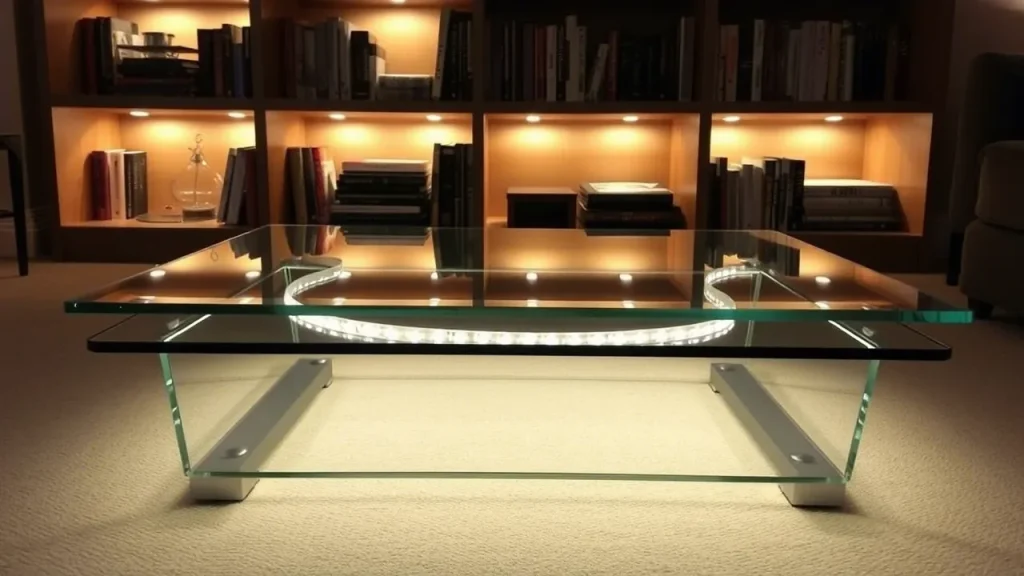
- Tabletop Trick: Place LED strip lights ($20) under glass tables for a glowing, futuristic effect. Tape them securely to avoid visible wires.
- Bookcase Hack: Tuck battery-powered puck lights ($10 for a pack) inside shelves to highlight depth and display items. Use warm LEDs for cozy vibes.
- Settings: Drop to f/5.6 for a shallow depth of field, blurring the background while keeping the lit area sharp.
Trick: Use a clapperboard app to sync multi-camera video shoots for dynamic 360° views, perfect for AR or social media.
Pure white backgrounds are a staple for e-commerce, but they’re tricky to nail:
- Lighting: Light the background separately, setting it two stops brighter than the subject (e.g., f/11 for the background, f/5.6 for the furniture).
- Flags: Use black foam boards to block light spill onto the furniture, keeping edges crisp.
- Tethered Shooting: Connect to a laptop with DigiCamControl (free) for instant feedback on background purity.
Hack: Shoot slightly underexposed and boost the background in post to avoid clipping highlights on the furniture.
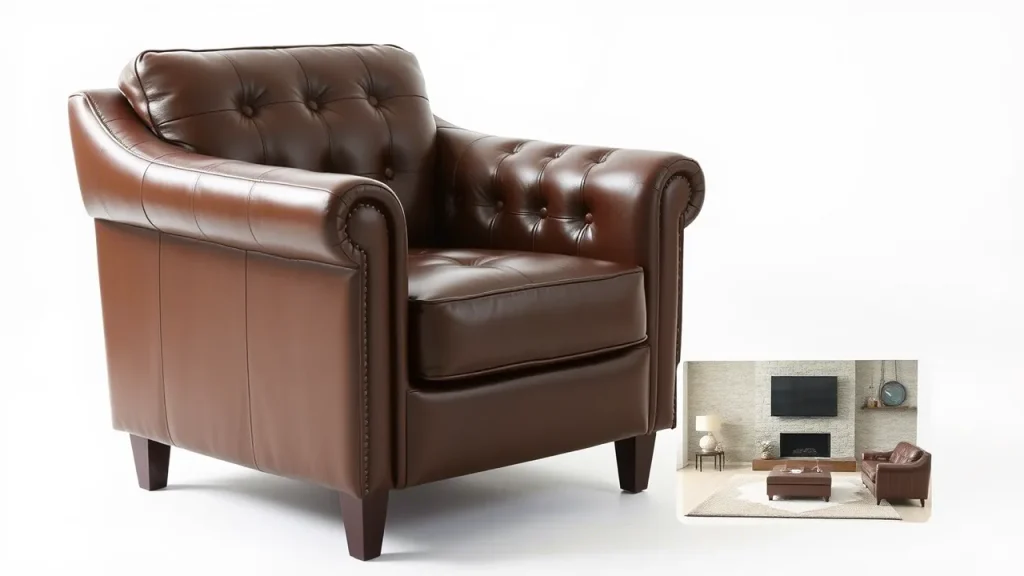
Virtual staging lets buyers visualize furniture in their space without physical props:
- Apps:
- Foyr Neo ($50/month): Web-based, drag-and-drop interface for quick room mockups.
- Planner5D (free tier): AI-powered for fast, realistic staging, ideal for beginners.
- Composition: Leave 30% negative space around the furniture for digital props like rugs or lamps.
- File Prep: Export images as PNG with transparent backgrounds for seamless integration.
Pro Move: Shoot 360° spins (24 frames minimum) and upload to Sketchfab for interactive 3D models on product pages.
Advanced techniques give your photography a competitive edge, whether it’s creating dramatic lighting effects, flawless white backgrounds, or immersive virtual experiences. These extras make your listings feel premium and tech-forward, appealing to modern buyers.
Pro Tip: Use an industrial turntable ($300) for smooth 360° product views, cutting down on manual repositioning and ensuring consistent lighting.
Solving Common Problems: Glare, Dust, and Color Woes
Even the best setups hit snags. Here’s how to tackle the most common furniture photography challenges with practical fixes and post-processing tricks.
High-gloss finishes are a nightmare for reflections, but you can tame them:
- Fix: Shoot through a black cloth with a lens-sized hole to block stray light. It’s like a DIY lens hood on steroids.
- Positioning: Place lights at a 10° angle from floor level to minimize direct reflections.
- Post-Processing: Use the clone stamp tool in Photopea to remove stubborn glare spots, blending with nearby textures.
Trick: Tape parchment paper over lights for extra diffusion, softening reflections without losing brightness.
Dust is the enemy of clean shots, especially on dark wood or glass:
- Pre-Shoot: Wipe surfaces with a microfiber cloth and use a camera blower ($10) to dislodge particles. For fabrics, run a lint roller ($5) over upholstery.
- Setup: Run a small air purifier ($50) in the studio two hours before shooting to reduce airborne dust.
- Post-Processing: Use the spot healing brush (Content-Aware) in GIMP to zap specks. Apply noise reduction selectively, masking edges to preserve detail.
Hack: Shoot at 40-60% humidity to reduce static cling, which attracts dust to fabrics and lacquered surfaces.
Accurate colors are critical for buyer trust—nobody wants a “cognac” sofa that arrives looking orange:
- Tools: An X-Rite ColorChecker ($120) is the gold standard for color calibration. Shoot it in the first frame for reference.
- DIY Alternative: Print Pantone swatches ($10) and use them as a budget-friendly guide.
- Workflow: In Lightroom, use the eyedropper tool on the ColorChecker’s neutral patch to set white balance, then apply to all images in the batch.
Pro Move: Create a custom camera profile in Darktable using the ColorChecker for consistent colors across different lighting setups.
Solving these problems ensures your images look professional and true-to-life. Glare-free, dust-free, color-accurate photos build buyer confidence and reduce returns, saving you time and money.
Pro Tip: Keep a furniture prep kit on hand: wood filler for scratches, leather conditioner for scuffs, and a fabric shaver for pilling upholstery. It’s a lifesaver for last-minute fixes.
Mobile Photography: Pro Results with Your Smartphone
No DSLR? No problem. Modern smartphones can produce stunning furniture photos with the right setup and apps. Here’s how to make your iPhone or Android a product photography powerhouse.
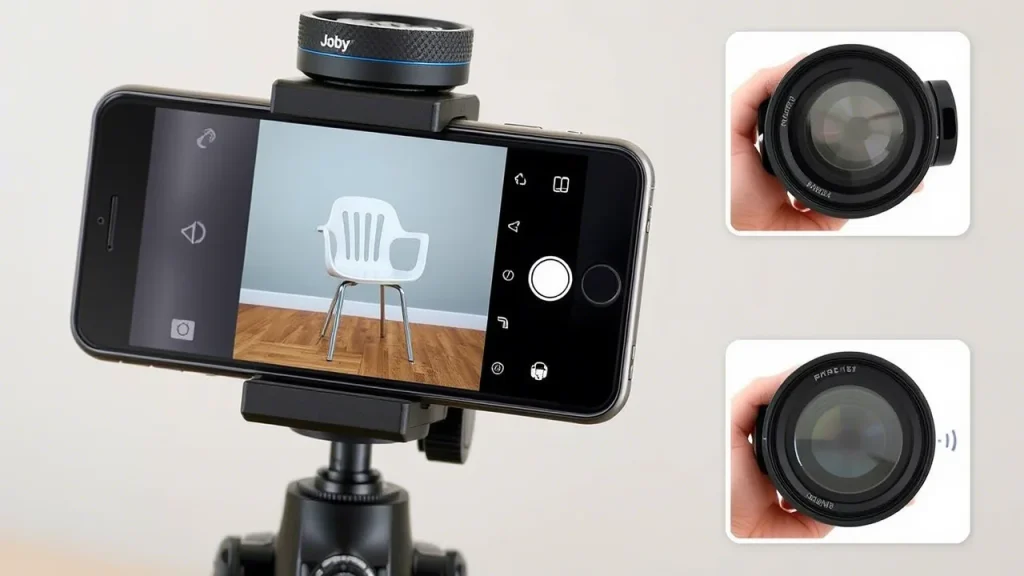
Turn your phone into a studio-grade camera with these tools:
- Lens: A Moment 58mm Tele lens ($120) with a macro attachment ($30) delivers sharp, detailed shots, perfect for stitching or inlays.
- App: ProCamera ($10) offers manual controls for exposure, focus, and white balance, giving you DSLR-like precision.
- Stability: The Joby GripTight Pro Mount ($40) clamps your phone to a tripod for shake-free shots, even in low light.
Trick: Enable your phone’s grid overlay to align compositions using the rule of thirds, just like a pro camera.
Polish your mobile shots with free or low-cost apps:
- Snapseed (free): Use selective adjustments to brighten specific areas, like a sofa’s armrest, without overexposing the background.
- VSCO (free tier): Apply film presets for a cohesive, professional aesthetic, ideal for Instagram or Pinterest.
- TouchRetouch ($2): Remove unwanted objects, like stray cords or reflections, with a single tap.
Hack: Use Snapseed’s “Healing” tool to erase dust specks or small scratches, saving time on larger edits.
No studio lights? These budget tricks create stunning effects:
- Bounce Light: Use a car windshield sun reflector ($15) to soften and redirect natural light, mimicking a softbox.
- Diffusion: Tape parchment paper ($5) over a desk lamp for a soft, even glow that flatters fabrics and wood.
- Color Gels: Wrap cellophane from gift boxes ($3) around your phone’s flash for creative color effects, like warm tones for cozy furniture.
Pro Move: Shoot in HDR mode to capture more dynamic range, especially for high-contrast scenes with bright metals or dark woods.
Mobile photography is a game-changer for small businesses or on-the-go shoots. With the right tools and techniques, your smartphone can produce images that rival DSLR quality, saving you thousands on gear.
Pro Tip: Shoot at 10AM-2PM for neutral natural light, especially for wooden furniture. Use a gray card to lock in accurate colors, even with a phone.
Future-Proofing Your Photography: Trends and Sustainability
Stay ahead of the curve by embracing cutting-edge tools, AR integration, and eco-friendly practices. These strategies keep your photography relevant and resonate with modern buyers.
AI is revolutionizing product photography, saving time and boosting quality:
- Background Removal: Remove.bg ($9/month) batch-processes images for clean, isolated product shots, perfect for Amazon or Shopify.
- Upscaling: Topaz Gigapixel AI ($100) boosts resolution up to 4x without pixelation, ideal for large-format prints or zoomable web images.
- Color Grading: Luminar Neo ($10/month) uses Relight AI to adjust lighting and mood with a single slider, simplifying complex edits.
Trick: Use Remove.bg’s API to automate background removal for high-volume shoots, cutting post-processing time in half.
Augmented reality lets buyers “place” furniture in their space before buying:
- 360° Spins: Shoot 24+ frames for smooth rotation. Use a motorized turntable ($150) for consistency.
- WebAR: 8th Wall ($99/month) creates browser-based AR previews, no app required.
- 3D Models: Upload spins to Sketchfab (free tier) for interactive product page embeds.
Hack: Shoot spins in a lightbox to ensure even lighting, then use Planner5D to mock up AR-ready room scenes.
Eco-conscious photography aligns with buyer values and cuts costs:
- Lighting: Use LED panels with solar batteries ($200) to reduce energy use. They’re portable for outdoor shoots, too.
- Backdrops: Source recycled fabric from local factories ($20/yard) for reusable, eco-friendly backgrounds.
- Props: Rent plants ($10/day) or shop thrift stores for unique, sustainable decor that adds personality to lifestyle shots.
Pro Move: Partner with local furniture makers to repurpose wood scraps as props, reinforcing your brand’s sustainability story.
Future-proofing your photography keeps you competitive in a fast-changing industry. AI tools streamline workflows, AR enhances buyer engagement, and sustainable practices appeal to eco-conscious consumers, all while saving you time and money.
Pro Tip: Create a “How to Photograph Furniture” PDF for clients, including prep tips like cleaning and staging. It builds trust and streamlines shoots.
Wrapping It Up
Furniture product photography is more than just taking pictures—it’s about creating images that tell a story, evoke desire, and drive sales. By mastering budget-friendly gear, material-specific lighting, strategic composition, and platform-optimized workflows, you’ll craft visuals that stand out in a crowded market. Add advanced techniques, mobile hacks, SEO smarts, and future-ready tools, and you’re not just shooting furniture—you’re building a brand that buyers trust and love.
Start small, experiment often, and keep your setup lean. With the tips in this guide, you’re ready to turn every sofa, table, and chair into a visual masterpiece. Now grab your camera (or phone), set up those lights, and start shooting images that sell in 2024 and beyond.

Nazmul Hasan
https://furniturephotoediting.comCreative content writer, blending information with engaging narratives